This is the continuation of Part 1, which was about setting up ECS and ECR. Assuming you read that, this Part 2 will be all about CI/CD with Codepipeline.
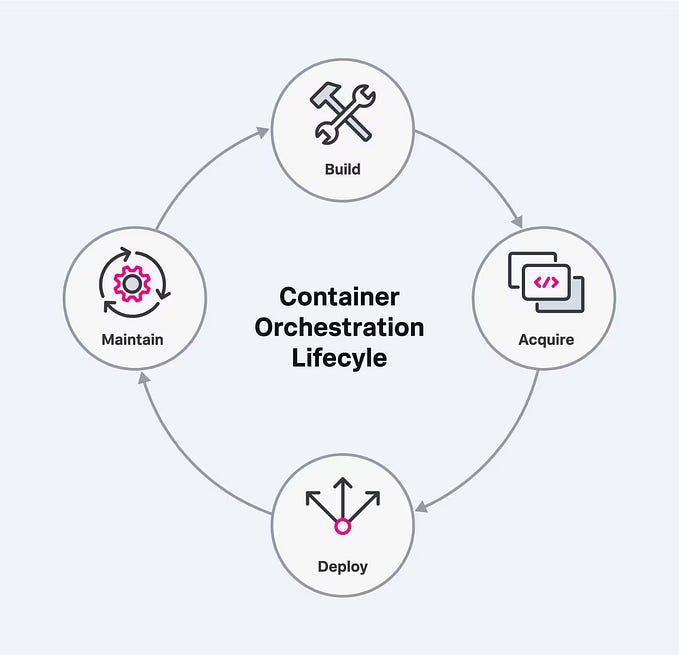
To refresh your memory, this is the architecture we are aiming for:

Before we begin, I just want to say that Codepipeline is kinda poorly documented and it really takes experience to figure out all the moving parts. Furthermore, the UI is a bit confusing and till today, I’m puzzled by why things are arranged the way they are now…
Codepipeline Proper
Here is a visualisation of Codepipeline flow diagram

Although there are Source, Build, and Deploy stages, these are not directly related to the “Source,” “Build,” and “Deploy” options in the CodePipeline side panel. However, in our use case, we will be using CodeBuild as our Build stage. I was also quite confused by this in the past, but I’ve come to understand that CodePipeline is its own independent service, which happens to use CodeBuild as part of its process.

Step 1: Set up Github App connection to AWS

Go to Settings > Connections and create a new connection. Choose any of the options you prefer, for the purpose of the post, I will choose Github. If you have never connected Github app to AWS before, it will pop up a Github Oauth page for you to login.

Since this is your first time connecting, select “Install a new app.” This will redirect you to a GitHub page where you can choose where to install the GitHub App — either on your base account or one of the organizations you belong to. Select the account or organization that contains your desired repository.
Next, you’ll be directed to the AWS Connector for GitHub page, where you can define the permissions for AWS access. As a best practice, it’s recommended to limit access to only the necessary repositories.

I need to highlight something here. AWS Connector for GitHub can only be installed on your Github account only once. So if you give it some repo access, and you do the same steps in another AWS account, it will also have access to those repos. I’m not sure if this is a Github limitation or what, but by default, it seems kinda against security recommendations. For our use case, since we are connecting it to only 1 AWS account, then that’s not a problem. Of course there are ways to mitigate this, but those are out of scope for this post. I just want you to be aware of this because sometimes I forget too.
Step 2: Set up Codepipeline
Go back to Codepipeline and create a new pipeline. Choose “Build a custom pipeline” option.

Give it a name and leave everything by default. It is more than enough for our small Prod environment.

Next, you will be brought to the Source stage. Select “GitHub (via GitHub App),” and you’ll see several fields to fill out. The GitHub connection you created earlier will appear in the dropdown menu — select it. Then, proceed down the form to choose the appropriate repository and branch for your setup. If you dont see your repo, then you probably didn’t give the Github app the right permissions. Go back to your Github > Settings > Integrations and find the AWS Connector for GitHub integration to configure it.

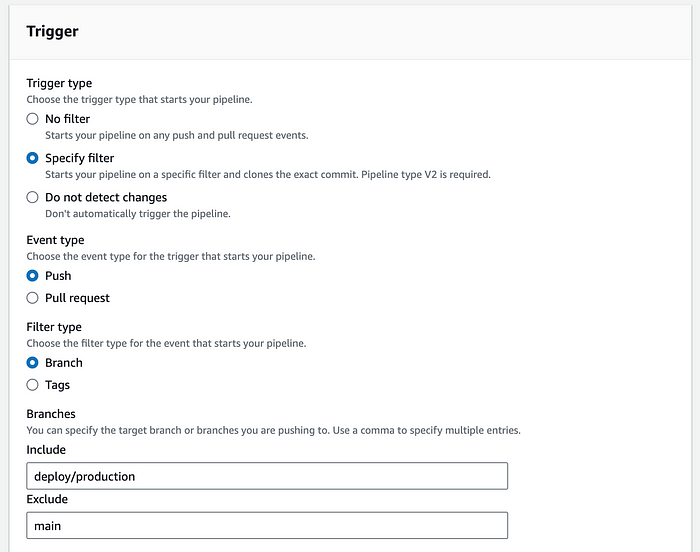
For the trigger, I typically configure it to trigger the pipeline only for the production branch, rather than using the default setting, which triggers on all push or pull request events. Of course, you can customize the trigger settings further based on your specific needs.
Now we can move on to the Build stage. Choose “Other build providers” and choose AWS Codebuild from the dropdown. As for project, we have not set up any, so click on “Create project”.

Create Code Build project will pop up, follow the instructions but here are a few things you need to take note of.
Very important! For the image part, if you chose x86 in ECS Task definition, then you choose one of the x86 images here. If you chose ARM, then choose one of the aarch64 images.
As for the service role, just give it a name and create a new one.

As for buildspec, there’s a lot of people on the internet that says how you should include a buildspec file in your Repo. However, let’s be honest — when working in organizations, you often don’t have the permissions to modify the app team’s code. And even if you do, getting them to make changes might require a personal favor. In my opinion, it’s far more practical to simply insert the build commands directly. This approach essentially creates a buildspec file on the fly, and I don’t see any downsides to doing it this way.

The “Build commands” is pretty tiny input field and it’s not what we want. Click on the “Switch to editor” and you should see this.

This is where most of you will pull your hair out, at least I did. It’s really trial and error until you get the buildspec which works for for you. Here is mine for your reference, hopefully it’s gonna alleviate your hair loss :)
version: 0.2

phases:
  pre_build:
    commands:
      - echo Logging in to Amazon ECR...
      - aws ecr get-login-password --region ap-southeast-1 | docker login --username AWS --password-stdin $ECR_BASE_URI
      - COMMIT_HASH=$(echo $CODEBUILD_RESOLVED_SOURCE_VERSION | cut -c 1-7)
      - TIMESTAMP=$(date +"%Y%m%d_%H%M%S")
      - IMAGE_TAG=$TIMESTAMP-$COMMIT_HASH
      - REPO_URI=$ECR_BASE_URI/$REPO_NAME
      - IMAGE_URI=$REPO_URI:$IMAGE_TAG

  build:
    commands:
      - echo "Build started on $(date)"
      - docker build -t $REPO_URI:$IMAGE_TAG ./server
      - docker tag $REPO_URI:$IMAGE_TAG $IMAGE_URI

  post_build:
    commands:
      - echo "Build completed on $(date)"
      - docker push $IMAGE_URI
      - echo "Creating imagedefinitions.json"
      - echo "[{\"name\":\"$CONTAINER_NAME\",\"imageUri\":\"$IMAGE_URI\"}]" > imagedefinitions.json

artifacts:
  files:
    - imagedefinitions.json
Let me explain what I’m doing here.
I am using 3 external environment variables.
CONTAINER_NAME: This is the name of the Service in ECS, not the Task Definition’s name. DO NOT MIX UP. Even though we define the ECR image in Task definition, we are updating the ECS Service here.
ECR_BASE_URI: This is the base uri of your ECR repo. The blue part in the image below. Do include the trailing /
REPO_NAME: The red part in the image below.

In essence, we are creating a unique tag for your image, building the image and then adding the tag when uploading to ECR. Using unique tag is a best practice so that rolling back is easy.
Then we will create an “imagedefinitions.json” artifact to be used in the Deploy stage. The container name, AKA Service name, is written into this file so that code deploy knows which ECS to deploy the ECR to.
Leave everything else default and continue to Codepipeline. At this point you should see the Project name you created. You can now add in the variables as per our buildspec above. Note that this part really depends on your buildspec, don’t just copy me.

Whooo! Finally the last stage, the deploy stage. This part is pretty simple, just fill all these up. Remember the “imagedefinitions.json” I talked about earlier, put that in else you will face errors in deploying.

Just one thing to note, for our simple production, our ECS Service Deployment options were kept as default — Rolling updates. In my opinion, this is good enough for lower scale applications. However, if you did choose Blue/green, then in the above “Deploy provider” field, you need to choose “Amazon ECS (Blue/Green)”.

Step 3: Release Change in pipeline and verify that everything works
If you somehow didnt get everything working on the first go, you can always go back into the pipeline. You should see a “Release Change” button on the top right. Click it and it will force the pipeline to run again, starting from the source stage. Wait a bit and you should see everything has turned green. Then go to your ECS Service and check out the information for the last deployment to see whether it coincides with your pipeline execution.

Conclusion
If this post seems a bit excessive and long, yes I agree. Setting up codepipeline to enable CI/CD (in its simplest form, we haven’t even included tests yet) is quite a tedious process. But hey, now you got a working production environment! Moving forward, I will come up with a Terraform script (IaC) for this set up. I don’t want to do this again and again too ><. Let me know what else you want to hear about in the comments :)